
The fire is a central part in bushcraft. It creates a connection between us and the nature we are visiting. By gathering firewood and getting to know the materials in the forest we create a bond to nature. The better we know our surroundings the stronger the bond gets. And with a stronger bond we feel more responsible towards nature. This is especially important in this time and age when nature is only seen as an object.
Objectification happens when there is a lack of bond or feelings towards something. This happens between humans as well. Some look down on certain races, on the other gender, on the rich or on the poor, simply because they don't have a connection to them.
This is why it's important that we create a strong bond to nature, and also that we help others create this bond as well.
Is a fire an environmentally friendly alternative to stoves?

We can bring a propane or alcohol stove on our trip, a lot of people even propose that is better because then we don't have to cut trees and branches in the area we are visiting.
But this fuel needs to be created somewhere too, at the expense of that environment. Not to mention the manufacturing of the canister and the transports of the different parts.
It's a much more honest way to put some effort into gathering firewood and make a real fire. And it definitely allows for a much nicer trip with a cosy atmosphere. The fire is a natural gathering point for the group, it's where the stories are told and the songs of old are sung.
Of course, in a protected nature reserve where the rules states we should not make a fire, or only at specified camp sites this should be respected.
But gathering firewood does not have a huge impact on nature, even if all the campers around the world did that it's not even close to the deforestation taking place around the globe. Rather, the bond this creates between us and nature should have the opposite effect.
The three elements needed in a fire
Much like ourselves, the fire needs oxygen, heat and fuel to survive. How these three elements affects the burning is important to know to improvise a fire for our purpose.
Oxygen
Oxygen is the air surrounding us. There's plenty of it, so lack of it shouldn't be a problem. But as the fire "eats" the air it's possible that it kills itself if there is not enough supply. This is why the firewood shouldn't be stacked too tight.
But if we want a long lasting fire with less heat, for example for a night fire. Then we want to limit the air supply to make it burn less intense.
On the other hand, if we want a hot fire for warming up or drying, then we place the firewood really loose to allow lots of air inside.
Heat
Heat transfers in three different ways.
- Conduction is transfer through direct contact with the heat source. For example when we burn our fingers on hot coals. This is also what makes it possible to fry food.
- Convection is transfer through air (or any other gas or liquid). The air doesn't conduct heat very well, but because it moves around it's still a good way to spread the heat. When the air heats up, it rises. This is why we hang the pot above the fire.
- Radiation is transfer through waves, the same way as light moves. Since the radiation passes through the air it directly heats up anything or anyone close to the fire. As with light, radiated heat can bounce on objects. This is important to know when building the fire. If we put a too big log in the fire it will block (and bounce back) any radiated heat in that direction. Sometimes this bouncing is a good thing. We can build a reflector to get the heat which would otherwise radiate away in the wrong direction, bounce back towards us.

The lack of heat is the reason a single branch won't burn by itself. This means we can safely leave a long piece of firewood sticking outside of the fire pit without risk of spreading the fire.
We also have to consider where the embers will fall. If they fall too far below the firewood the fire will loose it's conductive and convective heat and die out. This is common if the fire is too far from the ground with empty space between.
When we throw water to extinguish a fire we are essentially cooling it down with evaporation, which drains energy in the form of heat. The water also has a suffocating effect on the fire.
Fuel

Wood is our most common fuel in the forest. The wood burns on the surface, meaning more surface area gives more fire. So chopping the wood up in smaller pieces gives a more intense fire. To get a long lasting fire, there should be less surface area, meaning bigger pieces.
When lighting the fire we want lots of heat to get it started, we get this by using small pieces of wood (tinder and kindling).
Fire building
The fire pit
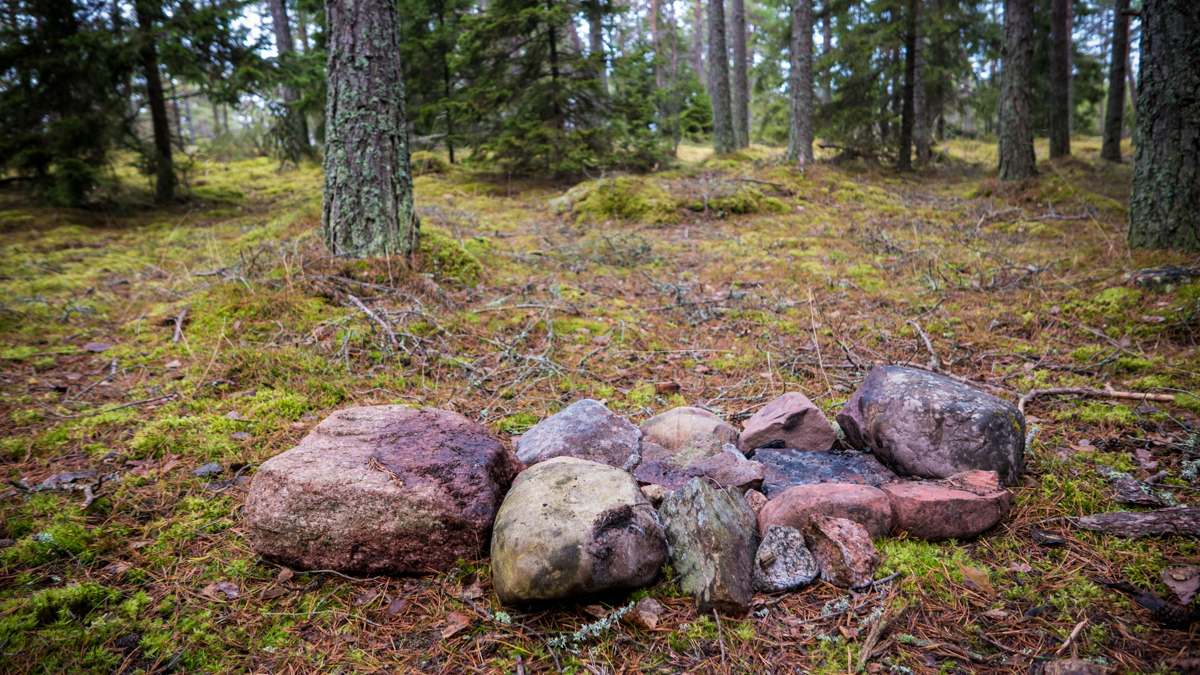
I see many variations of the fire pit on the net. It seems lots of people dig a hole where they make the fire, or they make a ring of stones. Neither of them is very efficient or safe.
When we build the fire pit we want to allow for airflow from underneath. Because heat travels upward, the best way to pull air from, is below. A dug hole will only hamper the air flow. A workaround here is to dig an air tunnel in the direction of the wind about a foot (30 cm) from the fire and into the hole. But that's a lot of work.
My preferred method is to make a base of stones. They should be big enough to raise the fire at least 4 inches (10 cm) from the ground. This both allows for air flow from beneath and protects the ground.
To make it really traceless we can remove a layer of moss or whatever is growing there before building the fire pit. Then, afterwards when we leave camp we throw away the stones and put the moss back in place. This is common practice for me in every camp.
The stones can usually be found in the roots of wind-felled trees, under moss or in riverbeds. Just be wary with wet stones as there us a risk they will split when hot and shoot sharp pieces around. This has, however, never happened to me. They have split but I never noticed any flying pieces.
Never make a fire directly on nice smooth cliffs. They are beautiful and it has taken nature tens of thousands of years to make them. The heat of the fire will crack them within an hour.
I prefer a long and narrow fire pit. This allows for long pieces of wood, which means less work preparing the firewood. Laying all the pieces in the same direction also has the advantage of making a very stable fire, on which we can safely place the pot.
If we can't find stones, for example in winter. The second best alternative is really wet rotten wood or fresh pine wood. In worst case we can use sand if it's available. I say in worst case because it easily gets in food and everything else. And it's hard to remove when we leave camp so not completely traceless.
The tripod

The tripod is made from three straight stems, preferably from dead trees. About 2 m long (6 feet). This may sound big, but it allows for better adjustment of the pot and it gives more space around the fire.
The three stems are laid out beside each other, with the root ends next to each other. A tying point is marked on each of them at the same height. One is then laid in a 45 degree angle over the other two. Then they are tied together at the marked spot, preferably using natural rope that don't melt. The knot I use is my own version of a tripod lashing. I do not know the actual name of the knot. Either way, it's much faster to tie and untie than the scout style tripod lashing that almost everyone uses.
Below are instructions with pictures. If the pictures are unclear or you have any questions let me know in the comments.
Below are instructions with pictures. If the pictures are unclear or you have any questions let me know in the comments.
 |
| Lay the tripod feet like this. Then measure the rope so one end goes almost down to the end of the poles. This end will be used as pot hanger. |
 |
| Then lay the rope like so. |
 |
| Now put each end through the opposite bight like so. Notice the ends have switched side. |
 |
| Tighten them up and put them next to each other. This is a good time to double check the length of the pot hanging end, and adjust accordingly. Next, pull the ends slightly downward to move the bights away from each other. |
 |
| Now a lot of things happened here on this image. Start by crossing the ends so the right one goes over to the left side and vice versa. By pulling them really hard out and away from the tripod the lashing is tightened. When it is tight, switch sides again with the ends, but this time under the tripod. Come back up on top of it, tighten it again and lock it with a square knot or any knot of your choice. The loose end is coiled. |
The remainder of the rope is then used to hang the hook for the pot in. Tie a taut-line hitch on this end for easy height adjustment.
 The hook can be made in several different ways. The best material is fresh pine, as that won't burn, even with a Dutch oven hanging there. If we're lucky we find a branch of the right form (C-shaped or S-shaped), but they're quite uncommon. Another way is to cut a branch with another branch sticking out. This creates a J-shape. We can then make a notch for the rope in the upper part. The third option is to tie together two J-shaped branches (one upside down) to create an S-shape.
Tinder
 |
| A great trick with birch bark is to fold it across the fibers to prevent it from curling up, which it otherwise does when burning. This allows us to hold it with less risk of burning and less risk of it suffocating itself. |
Tinder is the first material we light or catch sparks on. Common tinder materials are: birch bark, char cloth, feather sticks, grass, fat wood, juniper bark, certain fungi, paper and much more.
Char cloth is made by heating upp cotton or other organic material to high temperatures without allowing any air in. The same process used to create charcoal. This cloth is great for catching sparks but won't burn. It's used to light something else.
Certain fungi can be treated to work in the same way, the most common here being Tinder fungus (Fomes Fomentarius). The treatment is different however. It's traditionally made by boiling ashes and water together, then soaking thin slices of tinder fungus for hours in the filtered water. After drying it catches sparks easily.
Kindling
 |
| The dead branches from spruce trees burn really well and is almost always dry. |
The tinder is usually too small to get the big firewood pieces going. So we need something in between. This is called kindling, the best kindling material I've found are the dead thin branches on spruce trees. They are usually protected from rain under the fresh branches on the tree and they burn very easily. They come in many different sizes too so they naturally build up towards the firewood.
Fatwood can be used for kindling too, it burns well and hot and don't get wet from rain. This is my #1 choice when it's been constantly raining for a week. It's found in dead conifers, usually the roots, but any place where they've taken some damage during life, like if another tree has fallen on them. It's also found in high wear areas, like where the branches are growing from the stem.
Feather sticks are another good alternative when it's rained for a long time. The inner wood is usually dry in dead trees (with some exceptions, where the bark traps the moisture).
The most common kindling however, are just thinner pieces of firewood.
 |
| Kindling in the form of fat wood. This can make almost anything burn. |
Firewood
 |
| The safest way to chop firewood. No risk of cutting yourself. |
Harder woods burn hotter, while softer woods are easier to light and burns brighter but colder. I write more specifically about some woods below.
Good sources of dry firewood are dead standing trees or upright branches on fallen trees, dead branches on live trees works as well and dry driftwood is great too. When picking firewood from the ground it's very important that the ground is dry. Preferably rocks or cliffs where no water is gathered.
A quick tip is to pile the firewood where the smoke is blowing. No one want to sit there anyway, it's close at hand and it's the hottest side so the firewood dries faster.
A quick tip is to pile the firewood where the smoke is blowing. No one want to sit there anyway, it's close at hand and it's the hottest side so the firewood dries faster.
Building the fire
My favourite type of a classic camp fire is to place two big logs or half-logs in the bottom. Then a thin stick across them on each end. I follow this with another layer of logs, smaller than the ones in the bottom, but lying in the same direction. Finally I put two more small sticks across, then a third layer of even thinner logs in same direction as below. I then light the fire between the top and middle layer.
This creates a very stable fire to place the pot on. It's the top and middle layer that's the actual fire. The bottom two logs catch any embers and keep them alive by glowing themselves. The cross-sticks are just there for air flow.
Eventually the bottom logs will burn too, but at that point the fire is strong going and won't exhaust.
Eventually the bottom logs will burn too, but at that point the fire is strong going and won't exhaust.
Fire making tools and how to start a fire
Matches
Matches are easy to use, but very unreliable. If there is strong wind it's hard to keep them burning. And if they get wet, or the box gets wet they are useless.
Lighter
I get the feeling that every time I pick up a lighter it's empty. It has a limited fuel supply and unlike matches it's not possible to see how much is left. The non-refillable ones are totally not sustainable. While out to enjoy nature we shouldn't bring tools which are unnecessarily eating away at our planet.
If you really want to bring one, look into some real durable versions made for bushcraft.
Fire steel
The fire steel is my favourite fire making tool. It is easy to use and completely waterproof. They work by scraping shavings off a metal rod. These small shavings, when in contact with the air creates sparks around 3000 degrees. Which easily lights almost any thin tinder.
The material in the rod is Ferrocerium, an alloy of 30 % iron , 35-50% cerium , 25% lanthanum and a little neodymium, praseodymium, and magnesium. Sometimes incorrectly called flint. Ferrocerium derives from latin Ferro for Iron and cerium which are the two main components. Sometimes the ferrocerium rod is complemented by a rod or bar of magnesium. Magnesium does not ignite by itself, but can have shavings scraped off which in turn are ignited by the ferrocerium rod. This is great in wet conditions, but normally not really necessary.
The rod is accompanied by a striker. This is usually a metal plate used to strike the rod. An alternative to the striker is to use the spine of your knifes blade.
Flint and steel
Flint and steel is an old method where the carbon steels's ability to rust is used to create sparks. When carbon steel comes in contact with air it rusts. This rusting process produces heat. The reason big chunks of steel won't get hot is that the surface area is quite small in comparison to the mass, so the heat dissipates at the same rate as the steel heats up. When small pieces are shaved off they react with the oxygen which heats them up because they are small enough to be heated from every side.
Carbon steels are much less effective at creating sparks than the more modern ferrocerium rods. But is nonetheless a fun and challenging technique to learn. The tinder used should be char cloth or prepared tinder fungus, which easily catches sparks.
If you read my article on knives, you remember I discussed different hardness of metals. Pure iron is quite soft, and as such it does not chip very easily. By adding carbon to the iron we get carbon steel, which is harder but more brittle. Meaning it's easier to get sparks from.
In this video we see Youtube user Townsend making a fire using flint, steel and charcoal.
Friction fire
The perhaps most commonly know friction fire technique is the hand drill. Where a stick is quickly spun between the hands to create friction on a wooden board of the same material as the stick.
The bow drill is a similar method, but instead of using our hands we have a bow where the string is wrapped around the stick. So the bow is helt with one hand and the other hand is pressing down on the top of the stick to create higher friction.
A third method here is the plow fire. Where a stick is held with both hands and plowed back and forth on a board to create friction and shavings.
Neither of these methods creates a fire by itself. They create embers, which are then gathered on a leaf, piece of wood. birch bark or anything else at hand. The embers are put into a ball of tinder. This tinder ball is then blown on to light up.
Friction fire is a great technique to learn and master, as it can save you if you end up in a situation without any fire making tools at all.
In this video we see Youtube channel Innerbark Outdoors showing us how to make a fire using bow drill.
Fire piston
The fire piston works in a whole different way than other fire starters. As far as I know this method has never been used traditionally in the western countries. The first I heard about it was from Indonesia.
It works by compressing air to create heat. It consists of two parts. A pipe, where one end is shut, and a piston which fits precisely in the pipe. At the end of the piston is a small hole for tinder. By closing the pipe and piston really fast the air pressure rises which makes the temperature rise and ignite the tinder. It now needs to be opened as fast as possible, or the air will be exhausted by the glowing tinder.
Solar powered fire
Maybe not the go-to method when making a fire. It requires a clear sky and daytime so it's quite limited in use.
The idea is to collect the sun rays through a magnifying glass or reflective parabolic surface. (A clear bag or bottle with water works too)
Different woods and how they burn
Knowing the properties of different woods is important when choosing what kind of fire you want. Writing an article on this is quite a challenge, as the available wood varies a lot across the globe. I've decided to focus on some of the trees we have here in Scandinavia, and write from my own experience, backed up by facts from books and the internet. Writing about trees I have no experience of burning would just be copy pasting from the net, which I want to avoid.
Pine (Pinus)

Pine has the very convenient property that it sheds the bark and dries after being dead for a few years. So dead, standing pine trees are a great source of firewood. Any rain will just drip down along the stem, so they stay dry even after a long period of rain. But note that these dead standing trees are home to hundreds of species of insects. So they should not be cut unnecessarily. And when we do cut one, we first make a few chops to check that it's dry, so we don't cut it unnecessarily.
Dry pine burns well, not extremely hot but it's easy to light and collect. It does not make much embers, the embers it makes cools off fast. Thus a fire from pine needs constant feeding.
Fresh pine is close to impossible to burn. This is both a problem and a big advantage. If we can't find rocks for the fire place we can use a few fresh pine logs instead and feel safe that they won't burn through. This is also a great material for roasting sticks, tripod hooks and any wooden construction near the fire, as they won't burn off.
The best fatwood comes from pine, it burns easily, it burns hot and it burns bright. But it creates a lot of black smoke. Giving a bad taste to the food and making both your pots and yourself black and sticky. It is great for lighting a fire in rain though, as it won't soak up any water. It is found in damaged parts of the tree, the roots and the thickest part of the branches.
The branches are also thicker and as such burn longer and warmer and are dryer than the stem, they can create some embers too, unlike the stem.
Spruce (Picea)

Much like pine, the spruce will dry out while standing. Actually even faster than pine, because they can dry through the bark. It's a bit harder to light than pine but when it's started it quickly turns into a warm fire, not as warm as birch though.
The drawback of spruce is that it sends sparks flying in all directions. This is a big problem as they burn holes in cotton gear and melts synthetic gear. Wool can withstand the sparks really well. The sparks are of course also a fire hazard if left unchecked.
An old sami trick to lessen the sparks is to put ashes over the burning firewood. But preferably spruce should be avoided altogether, or only used as kindling. The reason for the sparks are small cells of pitch in the wood. The pitch starts boiling and explodes, breaking the wood which results in flying sparks.
These are two exceptions though, to the sparkling spruces. One is the roots, which doesn't spark at all, and can last for over a hundred years after the tree fell. The other is dry, rotten spruce, which needs some help to get started but after that burns slowly and for a very long time. Rottens spruce is best found in dead, fallen trees.
Fresh spruce burns better than fresh pine. But it needs an already strong going fire to get started. And as it dries out it will start sparkling too. Generally it's not worth the effort.
As I mentioned earlier the dead branches under the fresh ones are great kindling, which is no effort to pick.
Juniper (Juniperus)

During a long 6 day portage in the mountains on a canoe trip last summer, Juniper was our main source of firewood. It's great because it grows in nature where many other trees can't survive. And it's a very thick wood with lots of resin, which means it burns very hot (and I mean it, VERY HOT) and won't get wet from rain, even after weeks of raining. Except for the heavy smoke from fresh Juniper it's properties are about the same fresh as dry. This is reflected in the Sami language where the name Gaskas simply means Juniper. Most other woods have different names if they are dry, fresh or rotten.
Like spruce, Juniper sparkles a lot, especially if you burn the needles. A big stem sparkles less but is more uncommon to find. Much like pine, Juniper produces no embers, so it's not good for a long lasting fire.
Birch (Betula)

Birch burns both as fresh and dry, but it has very different properties, and takes very different technique to burn. You'd think dry wood is always preferred over fresh. But this is not the case with birch.
Dry birch is easy to burn. It burns hot with big flames and gives good embers. But it's very uncommon to find in nature, because the bark traps the water inside and the tree rots away before drying. The only recollection I have of finding naturally dry birch was on a riverbank where the current had gathered tons of beaver-shaved branches.

The best fresh birches are the crooked ones found high in the mountains. They are the driest. In the woods they are wetter, but can still be used. The season also matters here, in spring and early summer the sap rises and the wood gets really wet. This is much harder to burn, but even this wood can be used. After the trees have felled their leaves they are much dryer and the winter is the best time for burning fresh woods.
Willow (Salix)

The dry wood is excellent kindling and also works as firewood. A great property is that it creates very little smoke. The best pieces for fire are the straight ones since they make a more compact fire than the crooked ones. Different species are more or less crooked. Dry Salix sparkles a bit, though not as bad as spruce does.
Fresh Salix needs some dry wood to get started, this is not a problem however, since there is always some dry wood with the fresh ones, they can be burnt without removing the leaves. The embers from fresh Salix burns even hotter than fresh birch embers. And unlike the red glowig birch embers the salix embers are naturally covered in a thin layer of ashes which makes them last very long. Easily over a night if you made a hearty fire in the evening.
Salixes are generally dryer than birch. To check how dry it is we can make a cut with our knifes in the bark. The inner bark ranges from brown/yellow to green, where green is wetter.
A bonus: Angelica (Angelica)
Look over here preppers! This is not a tree, but a plant, the ones used are dead ones from the previous summer. It burns fast so it's not ideal for coooking. But it's great for heating the coffee pot. The amazing thing about Angelica is that it don't create any smoke at all. So whether you're stalking animals or escaping from nazis this is a great plant to look for. Also, it weights next to nothing so carrying it with you is no problem.Fires for different purposes
Cooking fire
A cooking fire should use only a little wood to make a concentrated fire. Preferably it should also be stable enough to place your pot on. And doing so should not suffocate the fire.
The Swedish torch

Very simple to make, but a bit hard to get started. The one in the picture is made from birch I'd kept under a roof for a few years. But finding a dry birch log is near impossible. It might work with a fresh one, I've never tried. But a better alternative is dry pine or spruce which burns easier and is readily available in the woods.
Simply split a log with your axe into 4 parts. Use rope, roots or branches to toe it together close to the bottom. If you use rope it should be a dispensable natural rope. (It can be used as emergency tinder as well.)
Another option is to only split the log halfway so it stays together in the bottom. This is quite tricky though, but if the log is cut with a round of branches in the bottom they can stop the splitting.
It's lighted from the top where the cuts meet, using birch bark and sticks. Tinder or kindling shouldn't be placed further down, they'll just stop the air flow. The best way is to keep feeding it from the top for a while after it's lighted. Fatwood sticks are great for this purpose! The big problem here is the airflow, so we have to be careful not to overfeed it, also, the cracks can be widened a bit to allow more air inside. When it gets started it burns well by itself for a long time.
In the picture I've crossed two logs on the ground to act as support. It's now possible to place a pot on top and start cooking.
Burn bowl
This one was unknown to me, until I heard about it from Scrambled O on Youtube. It's actually a method to make bowls. But it can be used at the same time as a movable, small, concentrated fire.
For me it didn't work out well. I used a little too wet birch, it was getting dark and started to snow so I didn't give it enough time to get started. But I'm looking forward to trying this again with more time!
Drying fire
 |
| This may look like a very tall, narrow and unstable fire. But since it's lighted from the top it burns down in a controlled fashion. |
A fire for drying/heating up should have great air supply and use small pieces of wood. It radiates a lot of heat and should be going for a few hours at least.
My favourite drying fire is using big logs in the bottom, smaller ones on top of them, in opposite direction. Then even smaller and so on. It's then lighted from the top and eats it's way down. Despite being high it won't fall apart since it's burning from the top and down. And it burns for a very long time without help, radiating a lot of heat. After days of constant rain you can still get yourself and all your clothes dry using this technique.
Long lasting fire
Night fires should last as long as possible and require as little maintenance as possible.
Nying
 |
| Starting up a nying, when it's started it burns slowly and peacefully. |
I have no idea what you call this in English, maybe someone can enlighten me in the comments? In Swedish we call it Nying. It's done either by splitting a big log or by placing two logs on top of each other. It's supported by 4 fresh pine stakes that won't burn, and for distance two small pine twigs are used. It's lighted using birch bark, spruce branches or fatwood along the whole length.
Pine or spruce are best options here, simply because there are not many other dry trees in this size.
Self-feeding fire

This is a fun one, which works really well. I guess the image speaks for itself. 4 fresh pine stakes are used as support, two on each side. Care has to be taken that the branches are completely removed, or the logs can get stuck on them, I keep forgetting this.
There is no worry that the fire will spread up the stakes. It's too cold there so the fire automatically dies out. If it climbs up there anyway, simply bend down the stakes away from the fire a bit.
Low effort fire
Tree root fire
Put fire on a big root from a fallen tree, preferably spruce or pine. It burns for a long time and very hot. It's hard to cook on but great as a night fire, especially in an emergency. Unless the stem is hollow there are no worries that it will spread along the tree. It's too solid and has no other materials helping it on the way.
Still, only do this in wet/cold conditions since it's a quite uncontrolled fire.
Three stems fire

This quickly became a favourite for me when I started using it. Cut a stem in three equally long parts. Or use 3 whole tree stems. Make a cut in each end using the axe. Just so you get a small crack. This will help them burn better and the crack will open up by itself as it burns.
Place the cracked ends together from different directions over the fireplace, make sure the crack is vertical. Start a small fire to get them going, then just keep feeding them towards the middle when necessary.
You save a lot of time and energy by not having to saw them and chop them up. And they last for a few days worth of cooking at least.
Final words
I hope you've enjoyed this article. If you're not already friend with the fire then I encourage you to go out and make one right now. The fire is something which should be respected but not feared. So try to get good friends with it, I promise you, it will be one of your most appreciated friendships ever!
I would love to hear what you think down in the comments.
 The next upcoming article will be on choosing water repellant gear without sacrificing our environment, a truly challenging task! Like us on our new Facebook page below or follow us on twitter @sustainablebush to get notified when it's published!
Bursa
ReplyDeleteMersin
izmir
Rize
Antep
BLE0CV
whatsapp görüntülü show
ReplyDeleteücretli.show
FPASJ
ankara parça eşya taşıma
ReplyDeletetakipçi satın al
antalya rent a car
antalya rent a car
ankara parça eşya taşıma
RNU
A0F2A
ReplyDeleteGiresun Parça Eşya Taşıma
Sivas Evden Eve Nakliyat
Tekirdağ Parça Eşya Taşıma
Tokat Lojistik
Edirne Lojistik
806C9
ReplyDeleteAğrı Evden Eve Nakliyat
Erzincan Parça Eşya Taşıma
Burdur Evden Eve Nakliyat
Kocaeli Parça Eşya Taşıma
Manisa Evden Eve Nakliyat
6D380
ReplyDeleteKilis Evden Eve Nakliyat
Mardin Evden Eve Nakliyat
order fat burner
Adana Evden Eve Nakliyat
Sivas Evden Eve Nakliyat
Referans Kimliği Nedir
buy oxandrolone anavar
Yozgat Evden Eve Nakliyat
Nevşehir Evden Eve Nakliyat
7480A
ReplyDeleteAdıyaman Sesli Sohbet
mobil sohbet
Siirt Seslı Sohbet Sıtelerı
Bilecik Görüntülü Sohbet Uygulama
malatya sesli sohbet uygulamaları
manisa canli sohbet bedava
Ağrı En İyi Ücretsiz Sohbet Siteleri
Çanakkale Yabancı Canlı Sohbet
canlı ücretsiz sohbet
43F9E
ReplyDeletetrezor suite
ellipal wallet
web avax wallet
arculus
trust web
wallet dcent
ledger live web
dcent wallet
onekey wallet web
72591
ReplyDeleteReferans Kimliği Nedir
Pinterest Takipçi Hilesi
Görüntülü Sohbet Parasız
Görüntülü Sohbet
Dlive Takipçi Hilesi
MEME Coin Hangi Borsada
Youtube Beğeni Satın Al
Kripto Para Madenciliği Nedir
Telegram Görüntüleme Satın Al
7748E
ReplyDeletedexview charts
poocoin
poocoin
zapper app
ronin wallet
poocoin bsc
geckoterminal charts
aave stake
mavia play
6DFA1CA563
ReplyDeleteYeni Telegram Oyunları
En İyi Telegram Coin Kazma Botları
Telegram Airdrop Botları
Telegram Para Kazanma
Binance Hesap
2C53FC3B5F
ReplyDeleteinstagram yabancı takipçi
twitter beğeni satın al
garantili takipçi
aktif takipçi
organik takipçi